
We have created extensive help. If you still need help reach out to [email protected]
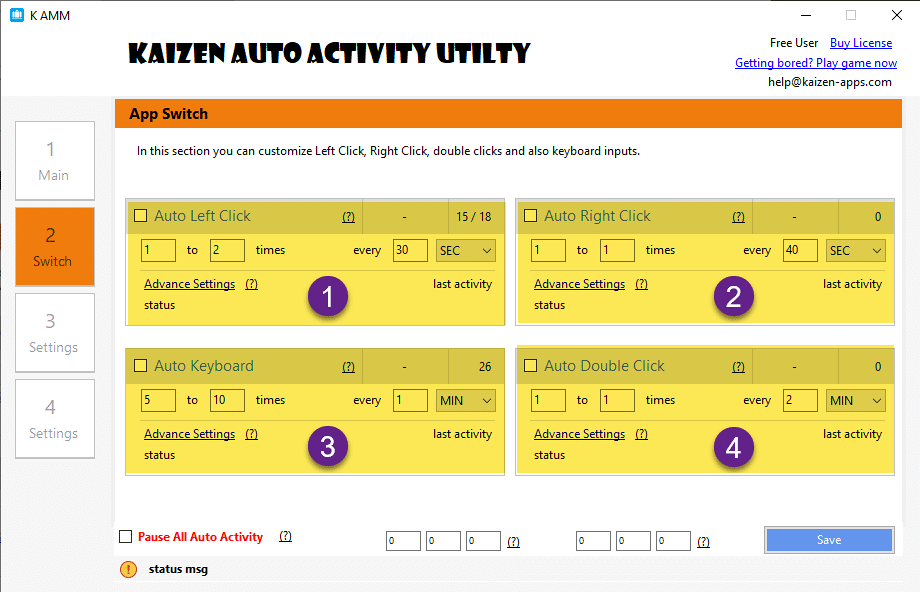
Section 2 will appear as shown below
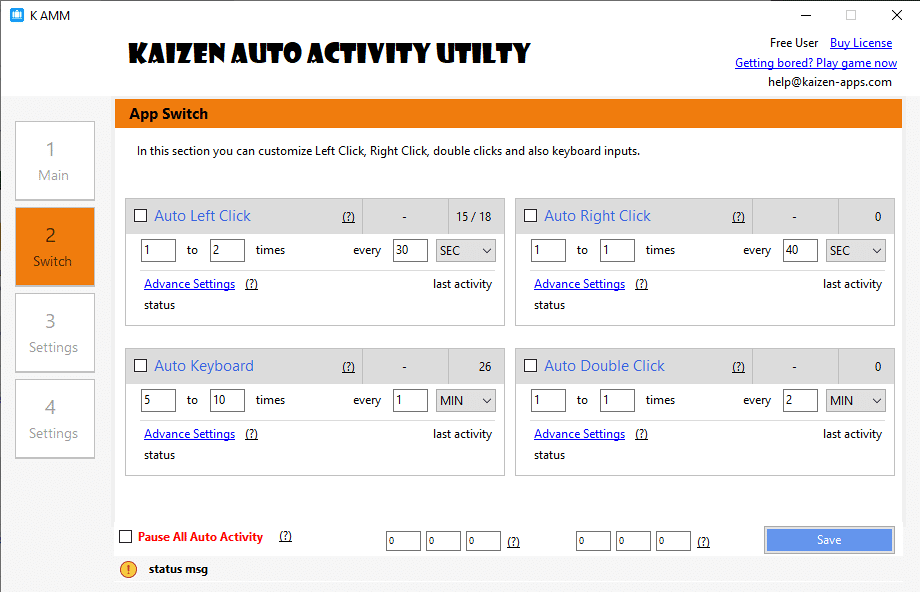
In Section 2, there are four important sections marked as 1, 2, 3 and 4.
1. Auto Left Click
All customizations related to Left Mouse Click can be done
here. Auto Utility generates random left clicks every time You
select a range and an interval frequency. For eg. you can
select 10 to 80 times every 2 minute. This will simply mean
that auto activity utility can generate activities as below
15 left clicks in 2 minute
25 left clicks in next 2 minutes
8 left clicks in next 2 minutes
and so on.. number of left clicks is random every time.
Normal Settings
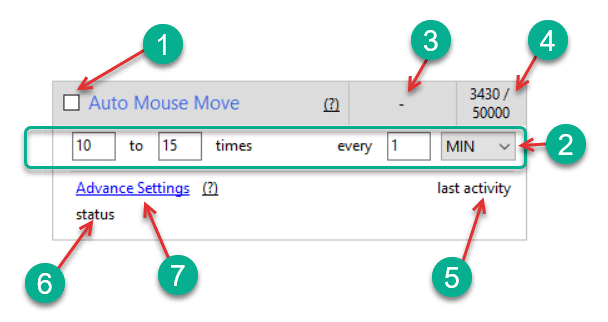 1. Enable / Disable Auto Mouse Move:
Select this checkbox if you want Left Click activity to
happen.
2. Configure Frequency and Randomness:
This is one of the most important settings. There are
two parts that work together. In Part 1, we assign Randomness
Range which is 10 to 15 times in the screenshot above. What it
means is that Auto Activity Utility will pick a random value
say 12.
1. Enable / Disable Auto Mouse Move:
Select this checkbox if you want Left Click activity to
happen.
2. Configure Frequency and Randomness:
This is one of the most important settings. There are
two parts that work together. In Part 1, we assign Randomness
Range which is 10 to 15 times in the screenshot above. What it
means is that Auto Activity Utility will pick a random value
say 12.
Part 2, we set frequency which means what is the frequency of the activity. It can be defined in Minutes (MIN) and Seconds (SEC). In the screenshot above we have selected 1 MIN, which means activity will be performed X number of times every 1 minute.
It is difficult to understand by only one example, let us see few examples of what it means
 If we select something like above it can mean, and activity
has started from 9:15 AM, then
If we select something like above it can mean, and activity
has started from 9:15 AM, then
In iteration one say at 9:15 to 9:16 AM, 10 times mouse movement will get generated
In iteration two say at 9:16 to 9:17 AM, 22 times mouse movement will get generated
In iteration three say at 9:17 to 9:18 AM, 20 times mouse movement will get generated
In iteration four say at 9:18 to 9:19 AM, 8 times mouse movement will get generated
and so on...
 If we select something like above it can mean, and activity
has started from 9:15 AM, then
If we select something like above it can mean, and activity
has started from 9:15 AM, then
In iteration one say at 9:15 to 9:35 AM, 7 times mouse movement will get generated
In iteration two say at 9:35 to 9:55 AM, 11 times mouse movement will get generated
In iteration three say at 9:55 to 10:05 AM, 5 times mouse movement will get generated
In iteration four say at 10:05 to 10:25 AM, 18 times mouse movement will get generated
and so on...
3. Current Iteration Count: It displays running iteration count of the current frequency. You will see that for the same interval it keep generating different values each time and hence it mimics human like behaviour. 4. Gross Count with / without Limit: It displays total mouse movements performed so far. If you have set LIMIT for the activity it will show that too. 5. Last Activity Timestamp: It shows timestamp of the last activity performed. 6. Status: It will show any error message or limit reached or activity not performed due to date restriction, etc. Keep an eye here, if anything appears in RED color, its important message to understand 7. Advanced Settings: Click this to configure advanced settings for Mouse Movements.
Advanced Settings
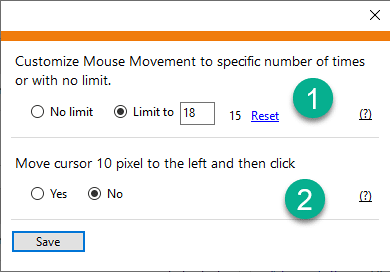 1. Limit / No Limit:
If you want mouse movement to occur for a specific
number of time only then you need to enable LIMIT and set
the desired value. If you want without any restriction, then
select NO LIMIT. If you want counter to reset then kindly
click on RESET.
2. Move Cursor before clicking:
This setting is useful if you want to move cursor a
bit left before clicking. If you want to keep clicking at
the same location, select option NO
1. Limit / No Limit:
If you want mouse movement to occur for a specific
number of time only then you need to enable LIMIT and set
the desired value. If you want without any restriction, then
select NO LIMIT. If you want counter to reset then kindly
click on RESET.
2. Move Cursor before clicking:
This setting is useful if you want to move cursor a
bit left before clicking. If you want to keep clicking at
the same location, select option NO
2. Auto Right Click
All customizations related to Left Mouse Click can be done
here. Auto Utility generates random left clicks every time You
select a range and an interval frequency. For eg. you can
select 10 to 80 times every 2 minute. This will simply mean
that auto activity utility can generate activities as below
15 left clicks in 2 minute
25 left clicks in next 2 minutes
8 left clicks in next 2 minutes
and so on.. number of left clicks is random every time.
Normal Settings
1. Enable / Disable Auto Mouse Move:
Select this checkbox if you want Left Click activity to
happen.
2. Configure Frequency and Randomness:
This is one of the most important settings. There are
two parts that work together. In Part 1, we assign Randomness
Range which is 10 to 15 times in the screenshot above. What it
means is that Auto Activity Utility will pick a random value
say 12.
Part 2, we set frequency which means what is the frequency of the activity. It can be defined in Minutes (MIN) and Seconds (SEC). In the screenshot above we have selected 1 MIN, which means activity will be performed X number of times every 1 minute.
It is difficult to understand by only one example, let us see few examples of what it means
If we select something like above it can mean, and activity
has started from 9:15 AM, then
In iteration one say at 9:15 to 9:16 AM, 10 times mouse movement will get generated
In iteration two say at 9:16 to 9:17 AM, 22 times mouse movement will get generated
In iteration three say at 9:17 to 9:18 AM, 20 times mouse movement will get generated
In iteration four say at 9:18 to 9:19 AM, 8 times mouse movement will get generated
and so on...
If we select something like above it can mean, and activity
has started from 9:15 AM, then
In iteration one say at 9:15 to 9:35 AM, 7 times mouse movement will get generated
In iteration two say at 9:35 to 9:55 AM, 11 times mouse movement will get generated
In iteration three say at 9:55 to 10:05 AM, 5 times mouse movement will get generated
In iteration four say at 10:05 to 10:25 AM, 18 times mouse movement will get generated
and so on...
3. Current Iteration Count: It displays running iteration count of the current frequency. You will see that for the same interval it keep generating different values each time and hence it mimics human like behaviour. 4. Gross Count with / without Limit: It displays total mouse movements performed so far. If you have set LIMIT for the activity it will show that too. 5. Last Activity Timestamp: It shows timestamp of the last activity performed. 6. Status: It will show any error message or limit reached or activity not performed due to date restriction, etc. Keep an eye here, if anything appears in RED color, its important message to understand 7. Advanced Settings: Click this to configure advanced settings for Mouse Movements.
Advanced Settings
1. Limit / No Limit:
If you want mouse movement to occur for a specific
number of time only then you need to enable LIMIT and set
the desired value. If you want without any restriction, then
select NO LIMIT. If you want counter to reset then kindly
click on RESET.
2. Move Cursor before clicking:
This setting is useful if you want to move cursor a
bit left before clicking. If you want to keep clicking at
the same location, select option NO
3. Auto Double Click
All customizations related to Left Mouse Click can be done
here. Auto Utility generates random left clicks every time You
select a range and an interval frequency. For eg. you can
select 10 to 80 times every 2 minute. This will simply mean
that auto activity utility can generate activities as below
15 left clicks in 2 minute
25 left clicks in next 2 minutes
8 left clicks in next 2 minutes
and so on.. number of left clicks is random every time.
Normal Settings
1. Enable / Disable Auto Mouse Move:
Select this checkbox if you want Left Click activity to
happen.
2. Configure Frequency and Randomness:
This is one of the most important settings. There are
two parts that work together. In Part 1, we assign Randomness
Range which is 10 to 15 times in the screenshot above. What it
means is that Auto Activity Utility will pick a random value
say 12.
Part 2, we set frequency which means what is the frequency of the activity. It can be defined in Minutes (MIN) and Seconds (SEC). In the screenshot above we have selected 1 MIN, which means activity will be performed X number of times every 1 minute.
It is difficult to understand by only one example, let us see few examples of what it means
If we select something like above it can mean, and activity
has started from 9:15 AM, then
In iteration one say at 9:15 to 9:16 AM, 10 times mouse movement will get generated
In iteration two say at 9:16 to 9:17 AM, 22 times mouse movement will get generated
In iteration three say at 9:17 to 9:18 AM, 20 times mouse movement will get generated
In iteration four say at 9:18 to 9:19 AM, 8 times mouse movement will get generated
and so on...
If we select something like above it can mean, and activity
has started from 9:15 AM, then
In iteration one say at 9:15 to 9:35 AM, 7 times mouse movement will get generated
In iteration two say at 9:35 to 9:55 AM, 11 times mouse movement will get generated
In iteration three say at 9:55 to 10:05 AM, 5 times mouse movement will get generated
In iteration four say at 10:05 to 10:25 AM, 18 times mouse movement will get generated
and so on...
If we select something like above it can mean, and activity
has started from 9:15 AM, then
In iteration one say at 9:15 to 9:35 AM, 7 times mouse movement will get generated
In iteration two say at 9:35 to 9:55 AM, 11 times mouse movement will get generated
In iteration three say at 9:55 to 10:05 AM, 5 times mouse movement will get generated
In iteration four say at 10:05 to 10:25 AM, 18 times mouse movement will get generated
and so on...
3. Current Iteration Count: It displays running iteration count of the current frequency. You will see that for the same interval it keep generating different values each time and hence it mimics human like behaviour. 4. Gross Count with / without Limit: It displays total mouse movements performed so far. If you have set LIMIT for the activity it will show that too. 5. Last Activity Timestamp: It shows timestamp of the last activity performed. 6. Status: It will show any error message or limit reached or activity not performed due to date restriction, etc. Keep an eye here, if anything appears in RED color, its important message to understand 7. Advanced Settings: Click this to configure advanced settings for Mouse Movements.
Advanced Settings
1. Limit / No Limit:
If you want mouse movement to occur for a specific
number of time only then you need to enable LIMIT and set
the desired value. If you want without any restriction, then
select NO LIMIT. If you want counter to reset then kindly
click on RESET.
2. Move Cursor before clicking:
This setting is useful if you want to move cursor a
bit left before clicking. If you want to keep clicking at
the same location, select option NO
4. Auto Keyboard
All customizations related to Left Mouse Click can be done
here. Auto Utility generates random left clicks every time You
select a range and an interval frequency. For eg. you can
select 10 to 80 times every 2 minute. This will simply mean
that auto activity utility can generate activities as below
15 left clicks in 2 minute
25 left clicks in next 2 minutes
8 left clicks in next 2 minutes
and so on.. number of left clicks is random every time.
Normal Settings
1. Enable / Disable Auto Mouse Move:
Select this checkbox if you want Left Click activity to
happen.
2. Configure Frequency and Randomness:
This is one of the most important settings. There are
two parts that work together. In Part 1, we assign Randomness
Range which is 10 to 15 times in the screenshot above. What it
means is that Auto Activity Utility will pick a random value
say 12.
Part 2, we set frequency which means what is the frequency of the activity. It can be defined in Minutes (MIN) and Seconds (SEC). In the screenshot above we have selected 1 MIN, which means activity will be performed X number of times every 1 minute.
It is difficult to understand by only one example, let us see few examples of what it means
If we select something like above it can mean, and activity
has started from 9:15 AM, then
In iteration one say at 9:15 to 9:16 AM, 10 times mouse movement will get generated
In iteration two say at 9:16 to 9:17 AM, 22 times mouse movement will get generated
In iteration three say at 9:17 to 9:18 AM, 20 times mouse movement will get generated
In iteration four say at 9:18 to 9:19 AM, 8 times mouse movement will get generated
and so on...
If we select something like above it can mean, and activity
has started from 9:15 AM, then
In iteration one say at 9:15 to 9:35 AM, 7 times mouse movement will get generated
In iteration two say at 9:35 to 9:55 AM, 11 times mouse movement will get generated
In iteration three say at 9:55 to 10:05 AM, 5 times mouse movement will get generated
In iteration four say at 10:05 to 10:25 AM, 18 times mouse movement will get generated
and so on...
If we select something like above it can mean, and activity
has started from 9:15 AM, then
In iteration one say at 9:15 to 9:35 AM, 7 times mouse movement will get generated
In iteration two say at 9:35 to 9:55 AM, 11 times mouse movement will get generated
In iteration three say at 9:55 to 10:05 AM, 5 times mouse movement will get generated
In iteration four say at 10:05 to 10:25 AM, 18 times mouse movement will get generated
and so on...
3. Current Iteration Count: It displays running iteration count of the current frequency. You will see that for the same interval it keep generating different values each time and hence it mimics human like behaviour. 4. Gross Count with / without Limit: It displays total mouse movements performed so far. If you have set LIMIT for the activity it will show that too. 5. Last Activity Timestamp: It shows timestamp of the last activity performed. 6. Status: It will show any error message or limit reached or activity not performed due to date restriction, etc. Keep an eye here, if anything appears in RED color, its important message to understand 7. Advanced Settings: Click this to configure advanced settings for Mouse Movements.
Advanced Settings
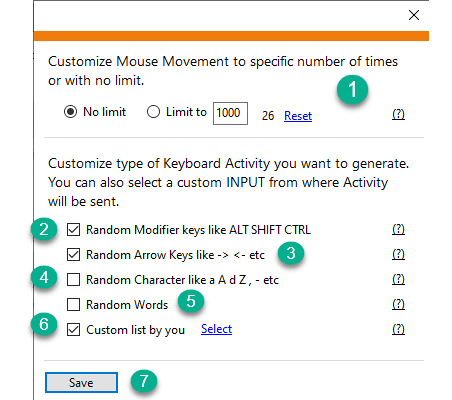 1. Limit / No Limit:
If you want mouse movement to occur for a specific
number of time only then you need to enable LIMIT and set
the desired value. If you want without any restriction, then
select NO LIMIT. If you want counter to reset then kindly
click on RESET.
2. Random Modifier Key:
Enable this checkbox if you want Modifier Key inputs
to be sent. This is a safe option if you don't want to risk
writing anything but still want to generate keyboard inputs
1. Limit / No Limit:
If you want mouse movement to occur for a specific
number of time only then you need to enable LIMIT and set
the desired value. If you want without any restriction, then
select NO LIMIT. If you want counter to reset then kindly
click on RESET.
2. Random Modifier Key:
Enable this checkbox if you want Modifier Key inputs
to be sent. This is a safe option if you don't want to risk
writing anything but still want to generate keyboard inputs
3. Random Arrow Key: Enable this checkbox if you want Arrow Key inputs to be sent. This is a safe option if you don't want to risk writing anything but still want to generate keyboard inputs
4. Random Characters like a-z A-z, etc: Enable this checkbox if you want random keyboard characters input to be sent. It will send random keys from a to z or A to Z, etc.
5. Random words: Enable this checkbox if you want random words input to be sent. It will send random words.
6. Custom List: You can provide your own input and Auto Utility will send inputs from this text. This is extremely important as it can type whole text paragraph, etc.